TravelDesk User Manual
easyGDS TravelDesk is a corporate travel booking self-service portal.
Getting Started
Sign in to TravelDesk using SSO or an email address.
Navigate to your organisation’s TravelDesk URL. The sign-in page offers three authentication options:
- Continue with Google — sign in using your Google Workspace account
- Continue with Microsoft — sign in using your Microsoft 365 account
- Email address — enter your corporate email and click Continue; TravelDesk emails you a one-time sign-in code to enter
Additional SSO Providers can be configured. Contact your easyGDS TravelDesk representative for details
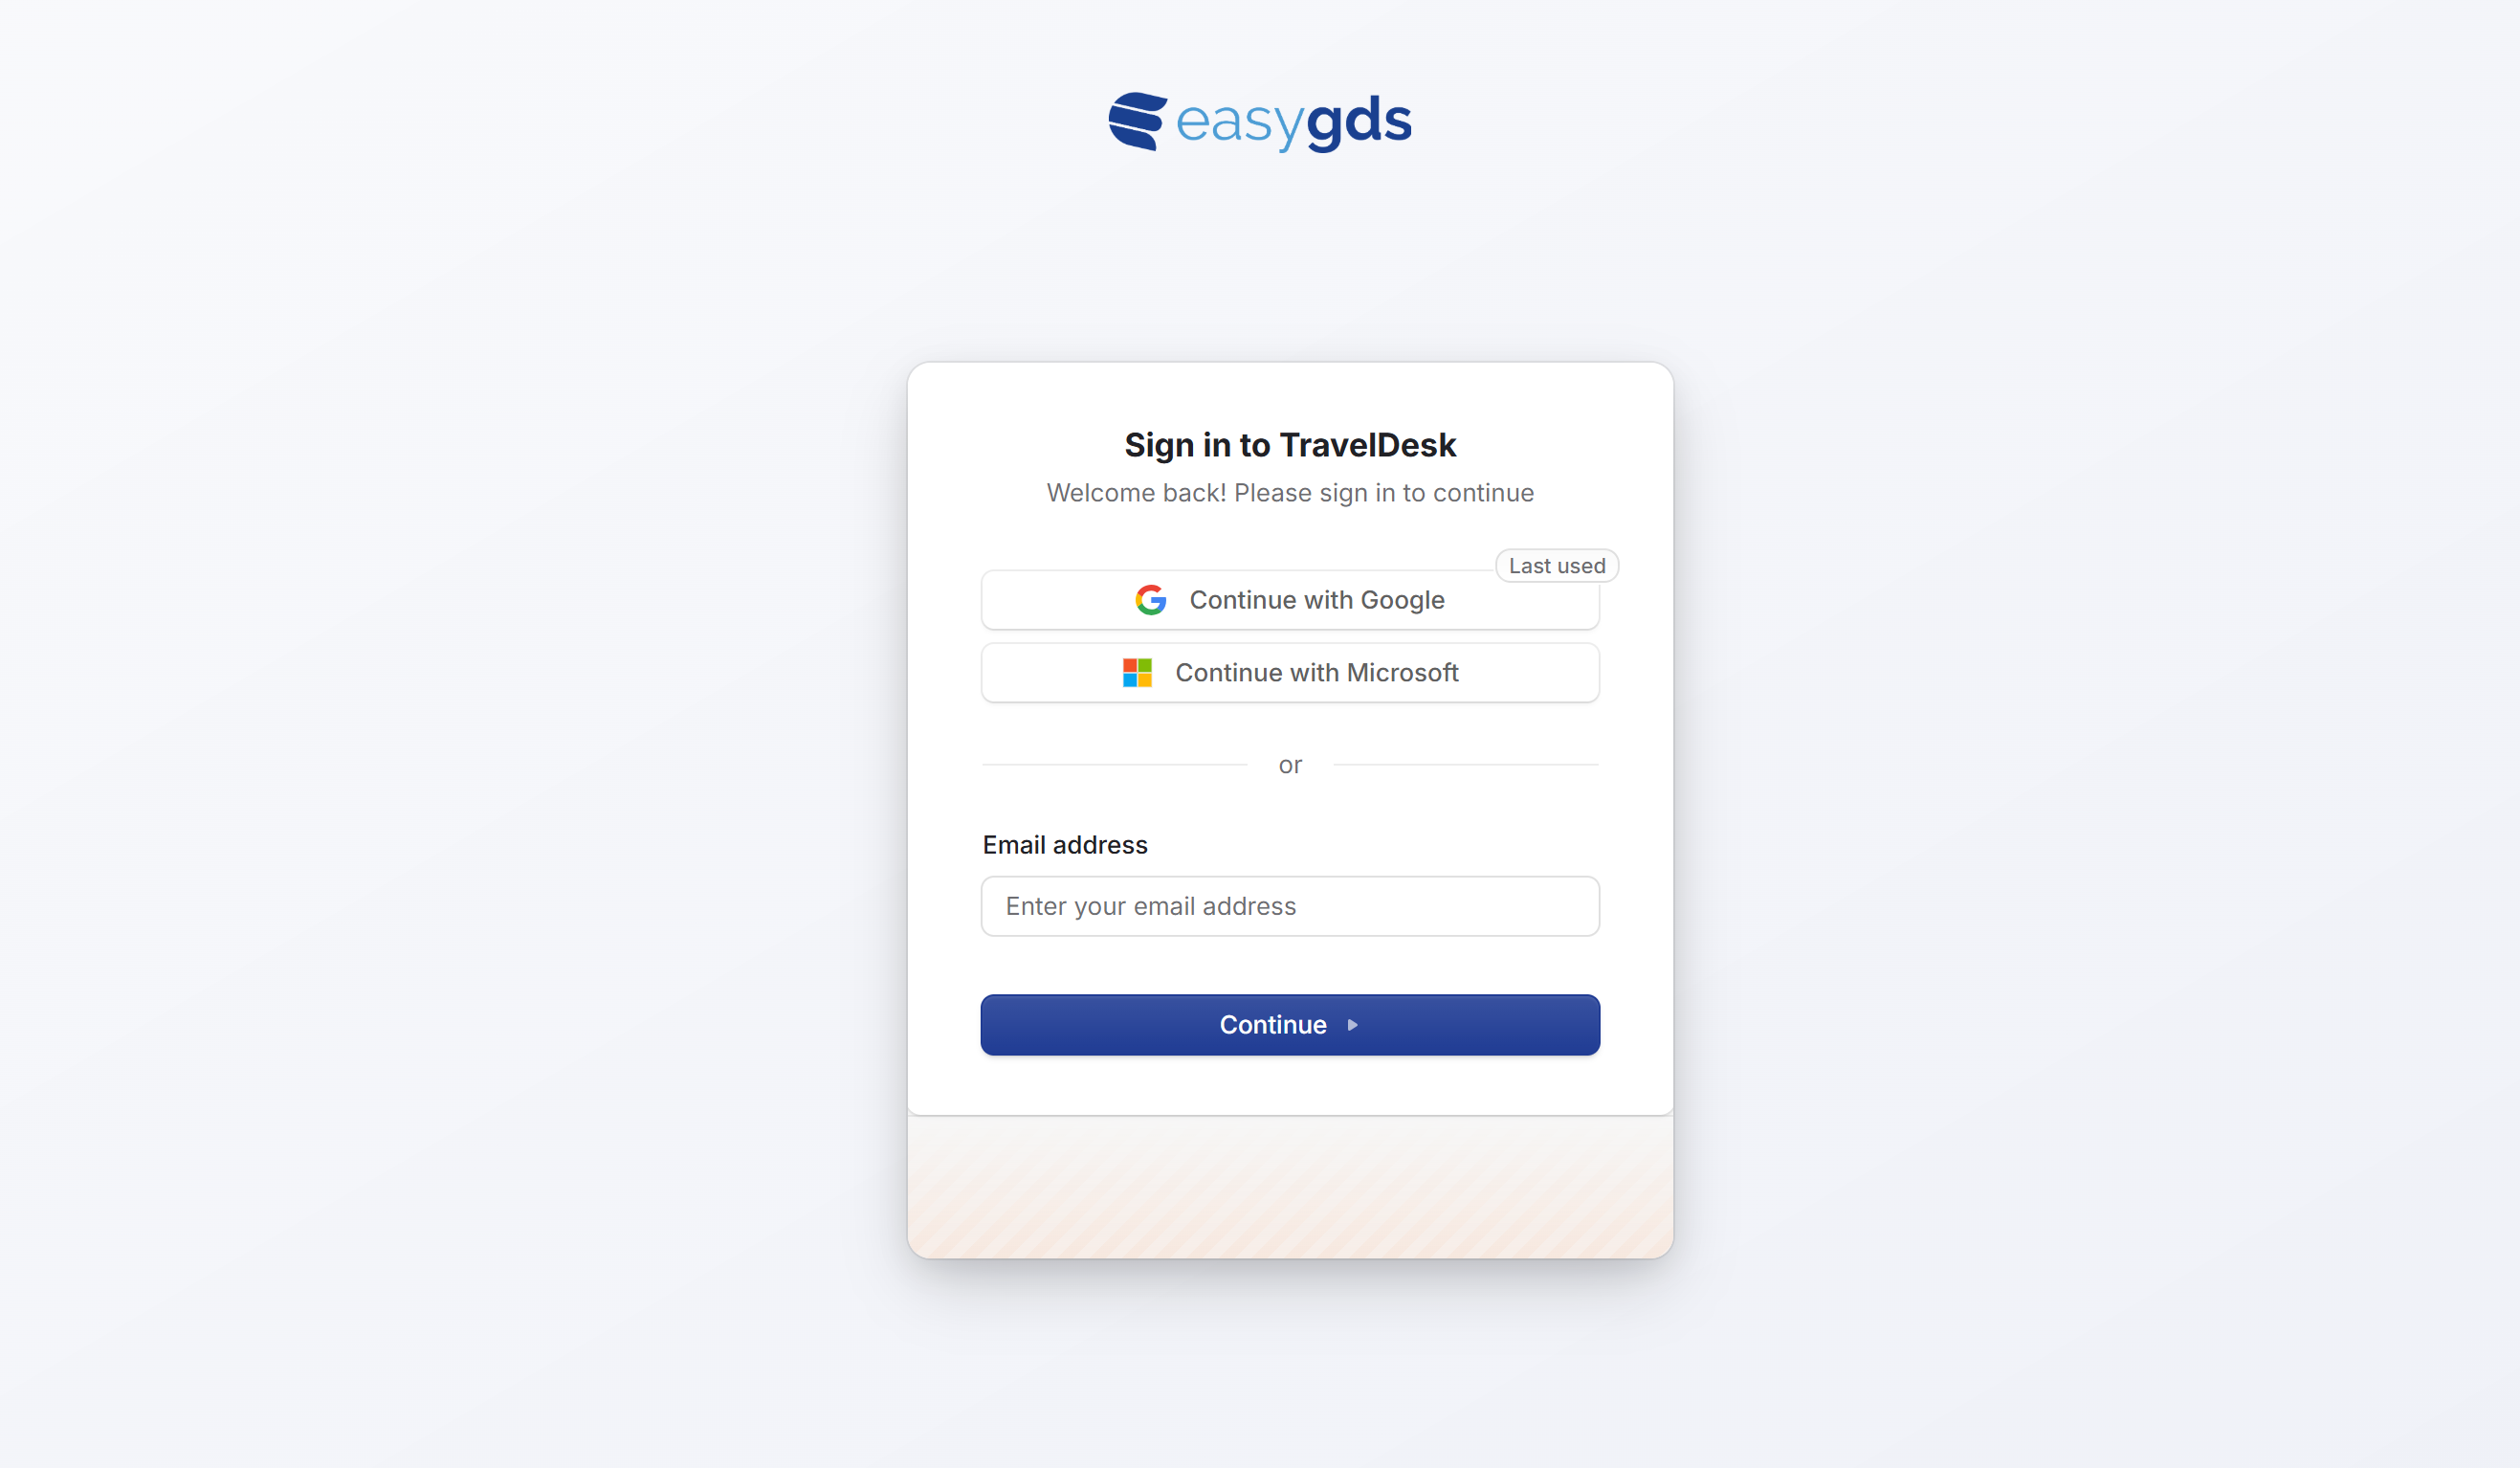
Tip — TravelDesk remembers your last-used sign-in method and highlights it for faster access on return visits.
First-time sign-in with email
Some organisations sign in with an email one-time code instead of — or alongside — SSO. You don’t register yourself: an administrator adds you to the employee roster first, and TravelDesk emails you an invitation. Open the link to confirm your email, and you’re taken straight into the portal. From then on, choose Email address, click Continue, and enter the one-time code TravelDesk emails you.
One profile, either method — email one-time code and Google / Microsoft SSO can both be enabled at once. Signing in either way with the same email address resolves to the same employee profile, so your requests, approvals, and travel details are identical whichever you use. There is no open self-registration — only an emailed invitation to a rostered address can create an account.
Navigation Overview
Get oriented with the primary sidebar and where each section lives.
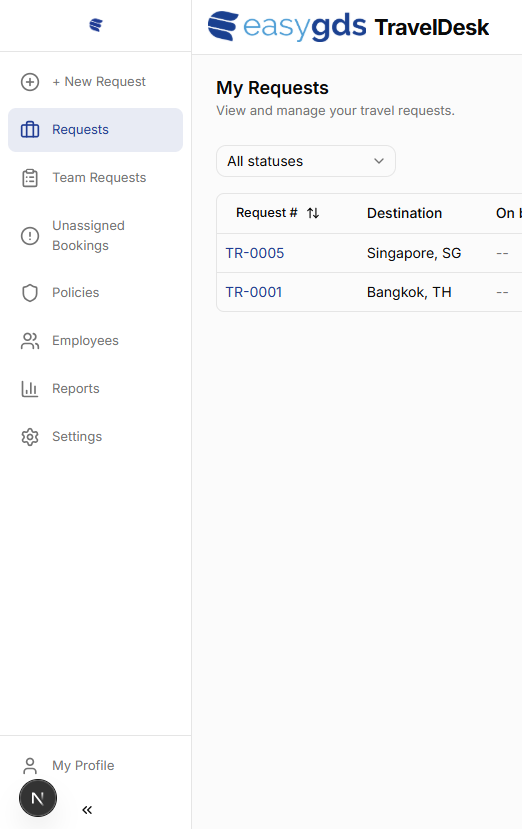
After signing in, the left sidebar provides access to all sections of TravelDesk. Nav item visibility depends on user role and permissions.
| Menu item | Description |
|---|---|
| + New Request | Open the form to create a new corporate travel request. |
| Requests | View and manage your own travel requests. |
| Team Requests | View travel requests submitted by your direct reports (managers). |
| Leisure travel | Personal / non-corporate travel search. Visible only when the leisure module is enabled for your tenant. |
| My Policy | View the travel rules that apply to your grade — flight class, hotel rate caps, carrier rules, and advance-booking notice. |
| Unassigned Bookings | Bookings received from the booking engine that have not yet been matched to a request (admin). |
| Policies | Configure flight class, hotel rate, and carrier policies (admin). |
| Employees | Manage employee profiles and grades (admin). |
| Reports | View travel spend and booking analytics (admin). |
| Settings | Configure system-wide booking and approval settings (admin). |
| My Profile | View and edit your personal travel profile. |
Travel Requests
Submit, track, and manage your travel requests through approval and booking.
3.1 — Viewing your requests
The Requests page lists all travel requests you have submitted. Each row shows the key details at a glance.
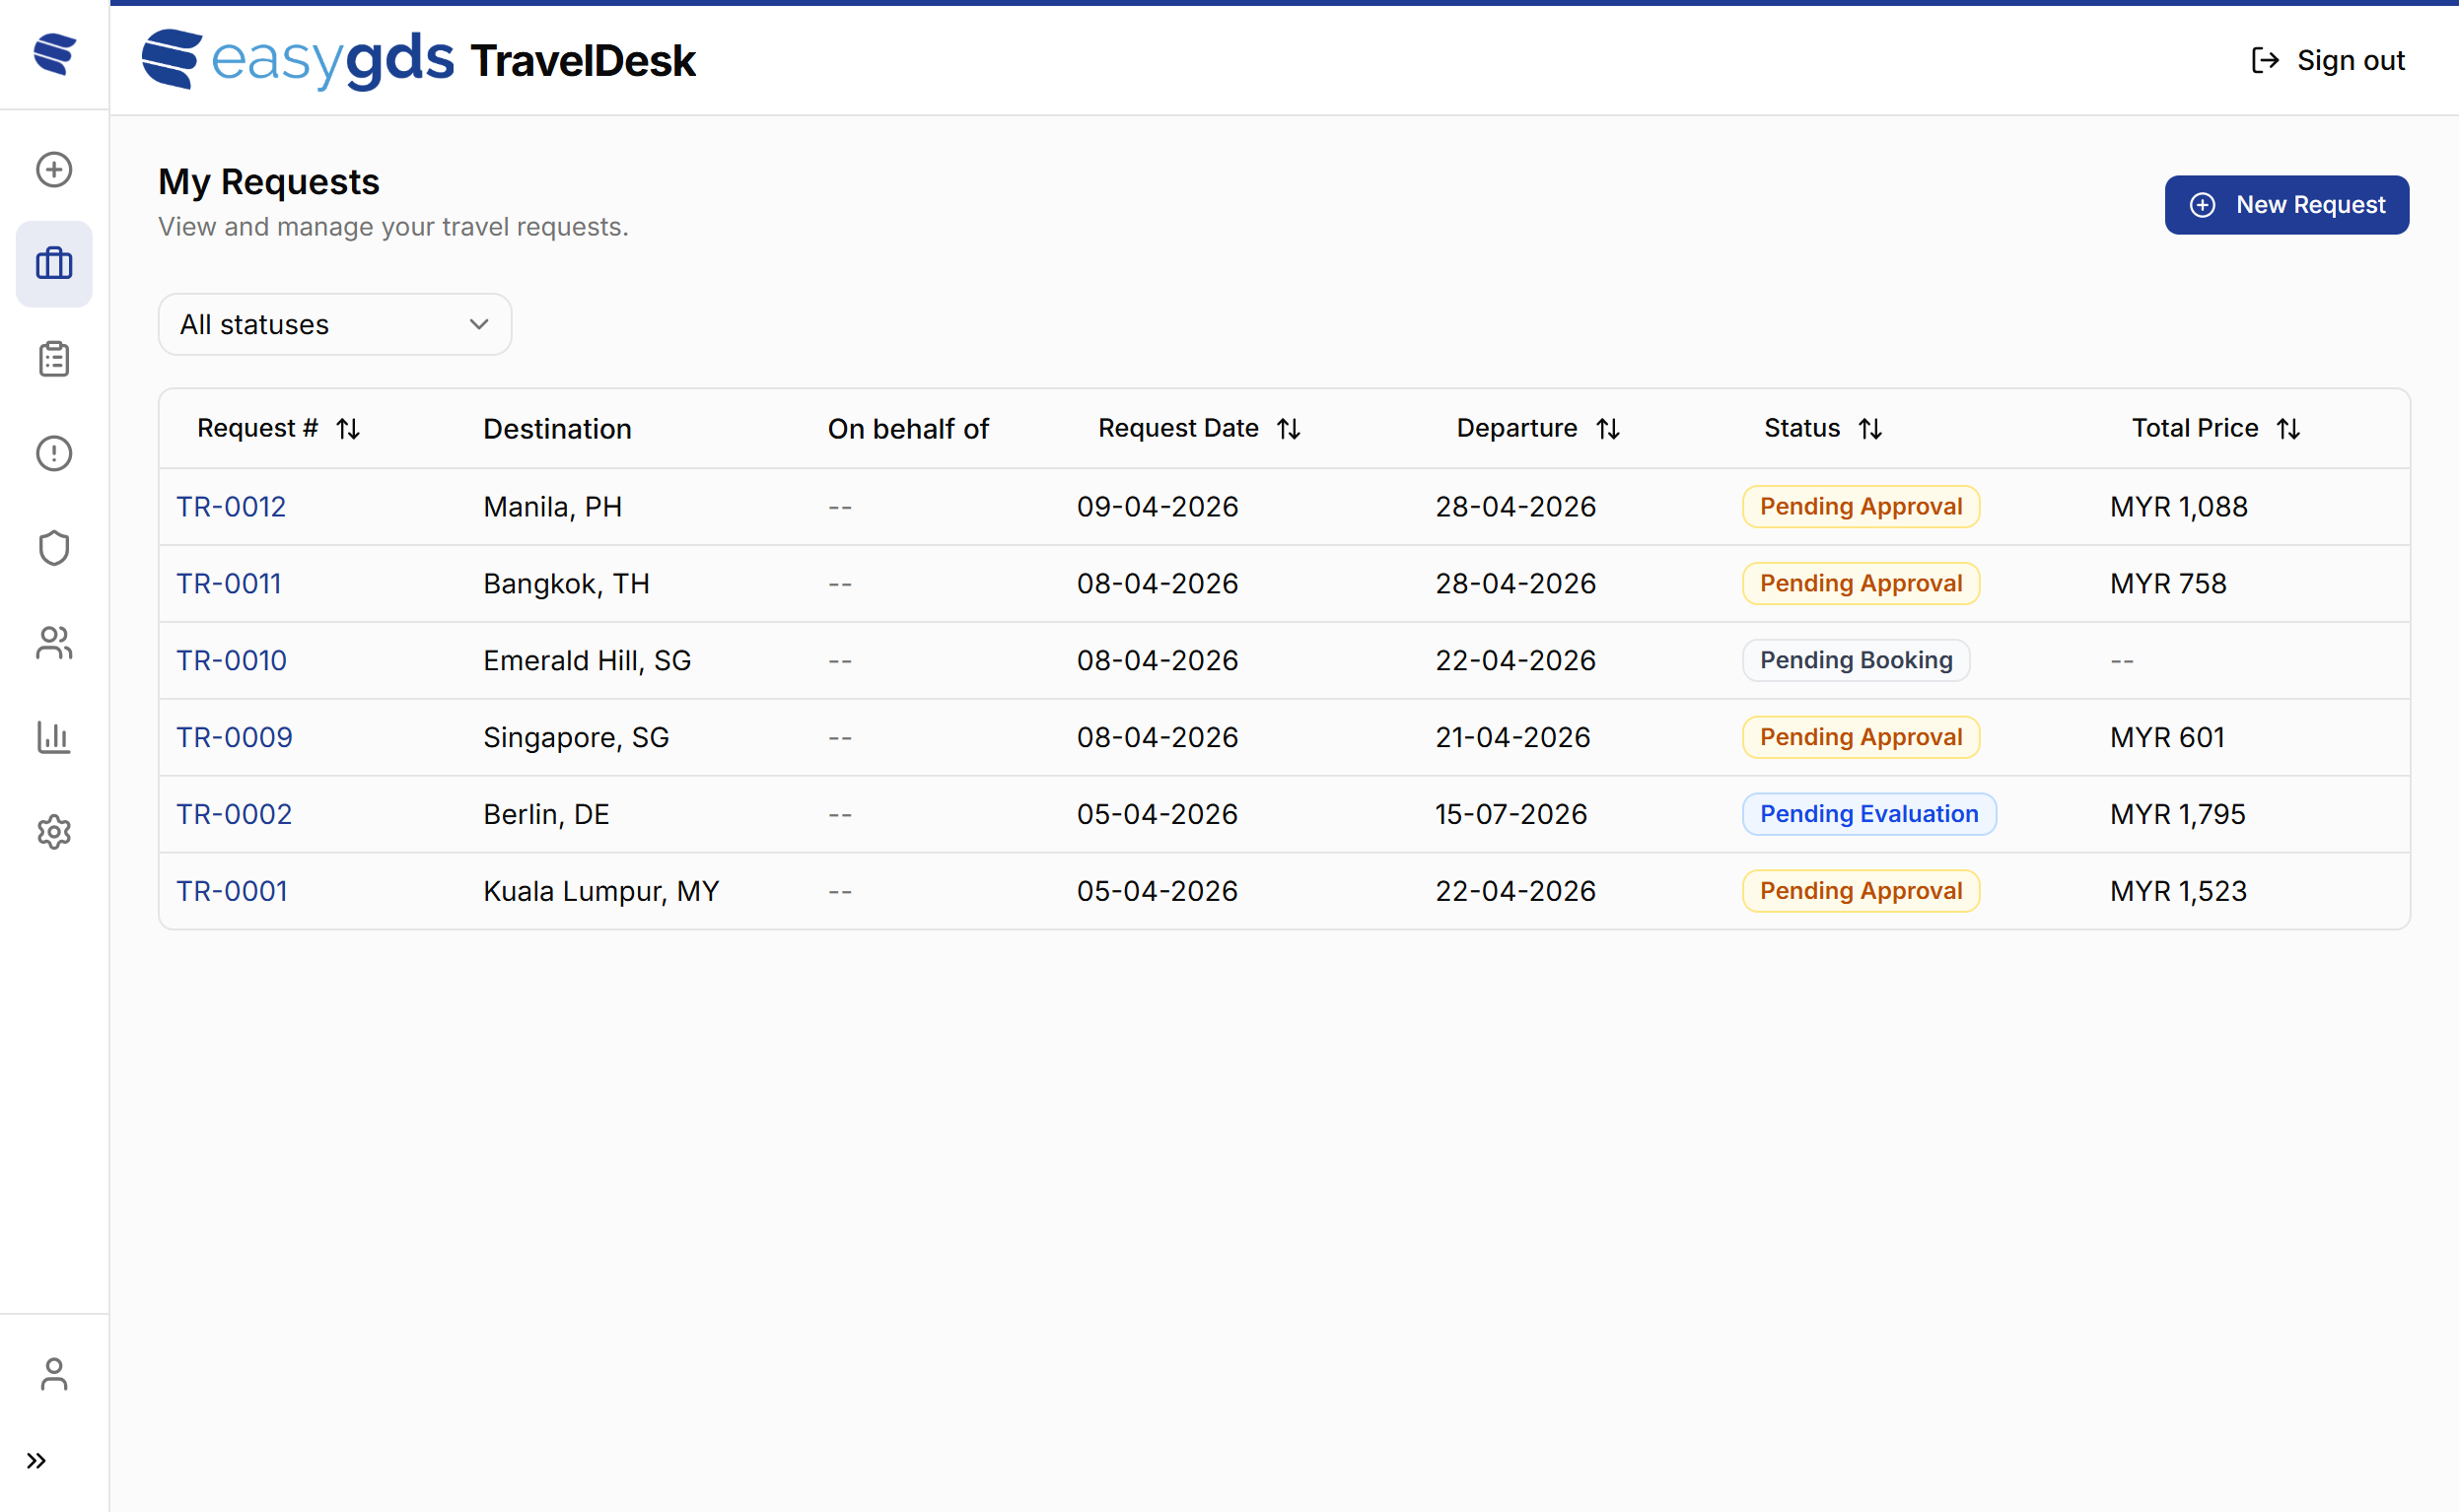
Columns
| Column | Description |
|---|---|
| Request # | Unique identifier (e.g. TR-0012). Click to open the
full request detail. |
| Destination | City and country of the travel request destination. |
| On behalf of | The traveller this request was raised for (if not yourself). |
| Request Date | Date the request was submitted. |
| Departure | Planned travel start date. |
| Status | Current approval / booking status (see below). |
| Total Price | Total booking cost. |
Status values
Statuses follow the request lifecycle (see What happens after you submit):
| Status | Meaning |
|---|---|
| Awaiting Details | Created from a booking that arrived first — add the trip details to proceed. |
| Pending Booking | Request submitted — use the Search & Book panel to make the booking. |
| Pending Evaluation | A booking was received and is being checked against policy. |
| Pending Approval | Awaiting manager (or delegate) sign-off. |
| Approved | Approved by your manager; the ticket is being issued. |
| Ticketed | Tickets issued — the booking is complete. |
| Rejection Pending | Rejected by your manager; can still be reversed during a short grace period. |
| Rejected | Finally rejected. |
| Cancelled | The booking was cancelled. |
Use the All statuses dropdown to filter the list by a specific status.
Editing a request
A submitted request can be edited while its status is Pending Booking — that is, after submission but before a booking has been attached. Open the request from the list and click Edit to change the reason, destination, travel dates, number of travellers, approval / PO number, or cost center. The traveller (On behalf of) and request number are fixed at submission and cannot be changed.
Once a booking is attached to the request, editing is locked.
3.2 — Creating a new request
Click + New Request in the sidebar or the blue New Request button at the top right to open the request form.
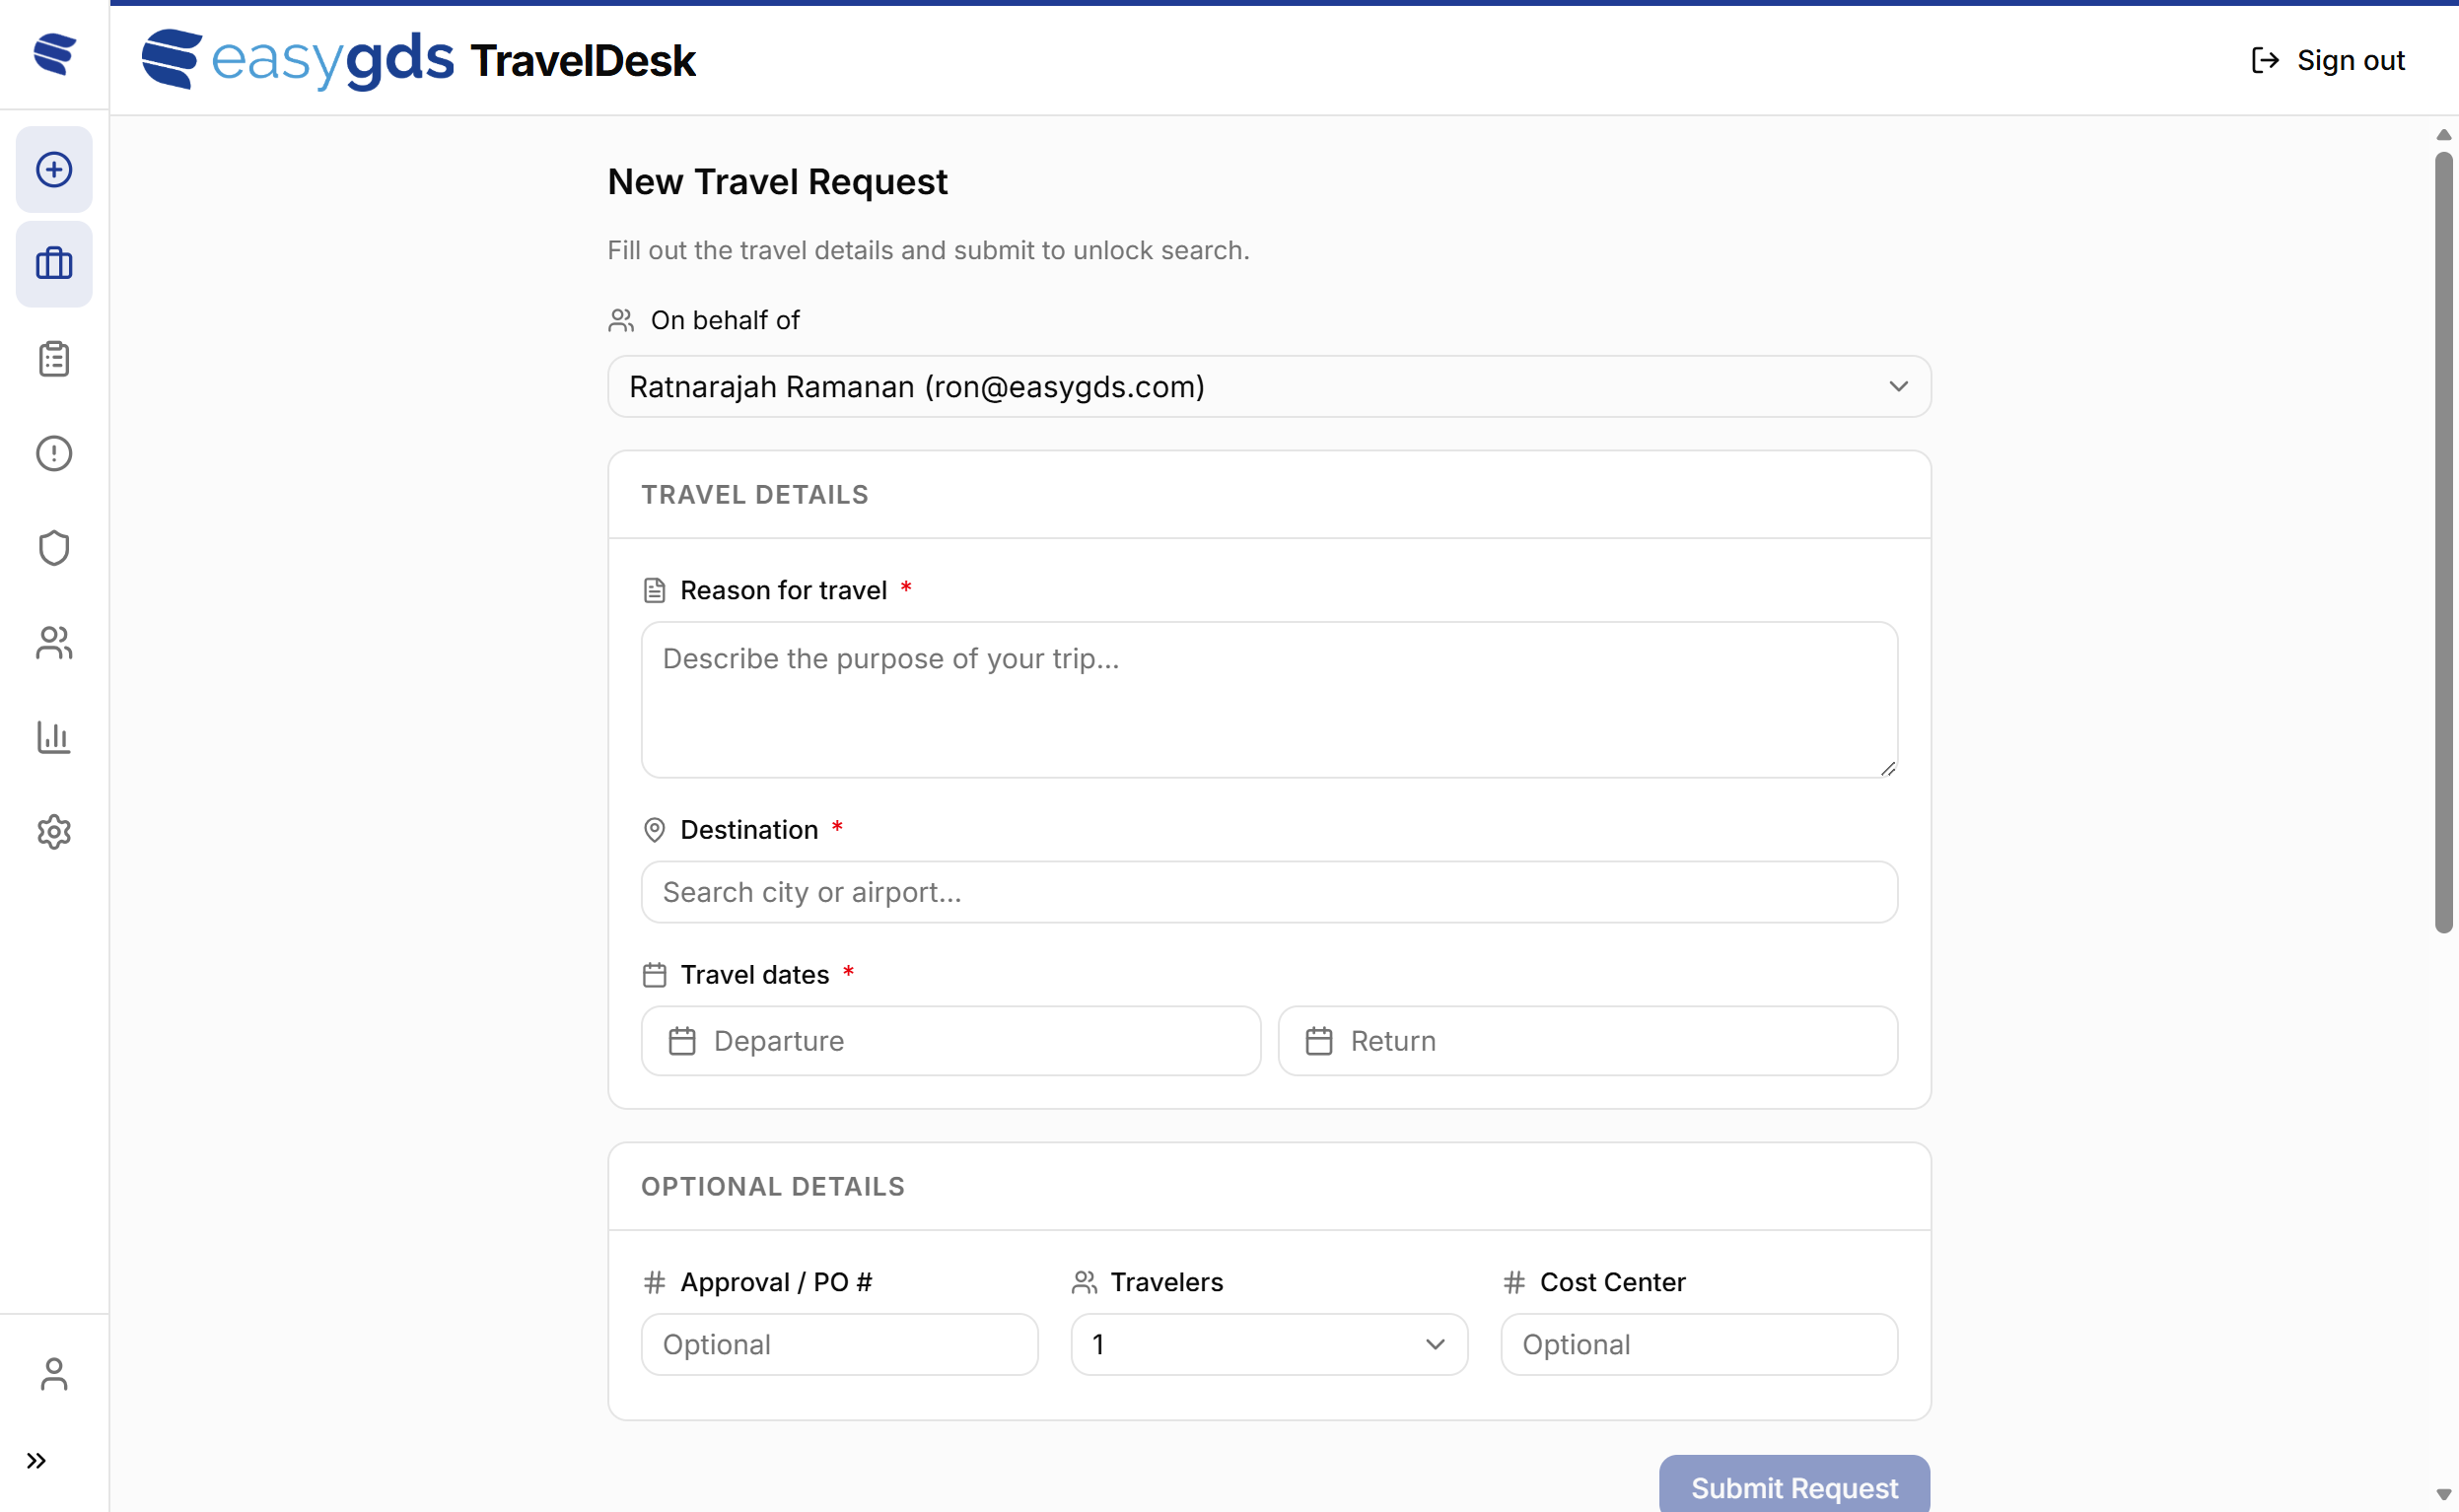
Required fields
The information on the travel request is used for reporting and included in the data feed to the enterprise ERP.
| Field | Description |
|---|---|
| On behalf of | Select the traveller from the dropdown. Defaults to yourself. This requires another employee having nominated the requester as a travel arranger. |
| Reason for travel | Free-text description of the trip purpose (required). |
| Destination | Search by city name or airport code. |
| Travel dates | Select travel start and end date from the calendar pickers. |
Optional fields
| Field | Description |
|---|---|
| Approval / PO # | Internal purchase order or pre-approval reference number. |
| Travelers | Number of travellers (default: 1). |
| Cost Center | Internal cost centre code for accounting allocation. |
Once all required fields are filled in, click Submit Request. The request is created in Pending Booking status, where a Search & Book panel lets you make the booking — see What happens after you submit below.
View travel policy
The View travel policy button at the top right of the form opens a side panel showing the travel rules that apply to your grade — flight class limits, hotel rate caps, carrier rules, and advance-booking notice periods. Use this before submitting to confirm a planned booking will be compliant.
The same view is available at any time from the My Policy sidebar entry.
3.3 — What happens after you submit
Submitting a request does not book anything by itself. A request moves through these stages:
- Pending Booking — your request is created. A Search & Book panel appears on the request: choose Flights, Hotels, or Packages, enter the details, and launch the connected booking site. The trip details you entered pre-fill the search, and your saved profile pre-fills the traveller information.
- Pending Evaluation — once a booking comes back from the booking site, it is automatically checked against your travel policy.
- Pending Approval — if the booking needs sign-off (it breaches policy, or auto-approval is off) it goes to your manager. Compliant bookings can be Approved automatically when Auto-Approve Compliant Bookings is enabled (see Settings).
- Approved → Ticketed — after approval the ticket is issued. Ticketed means the booking is complete.
Note — the booking is made before approval and policy evaluation, not after. Approval reviews the actual fare and itinerary that came back from the booking site. If a fare increases beyond the configured threshold between approval and ticketing, the request is sent back for re-approval.
If a booking arrives that the system can’t match to a request, an admin matches it for you from Unassigned Bookings; you may be asked to complete the trip details first (Awaiting Details).
My Profile
Manage the traveller details used to pre-fill bookings, and set who can act for you.
Every employee has a My Profile page (sidebar → My Profile). The details saved here pre-fill the booking site whenever you — or your travel arranger — make a booking, so they should match your travel documents. The page shows each area as an expandable panel; open one, click Edit, make your changes, then Save.
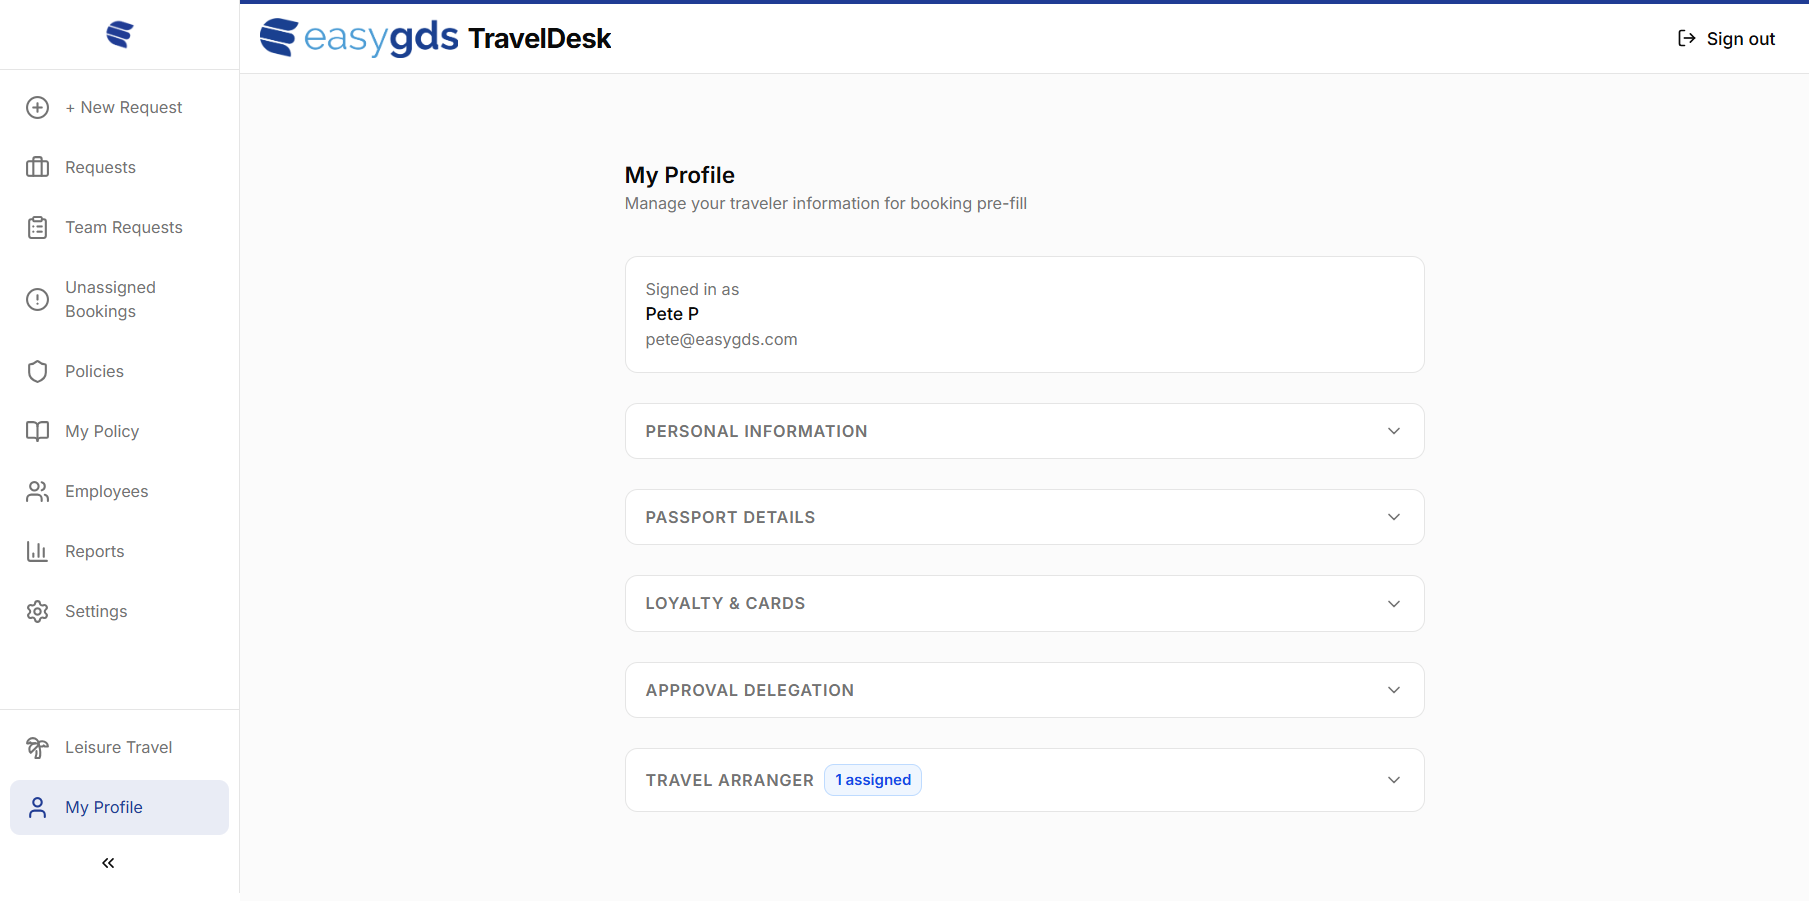
Signed in as
A read-only card showing the name and email of your signed-in (SSO) account. This is your login identity and cannot be changed here — your traveller name is set separately under Personal Information, so it can differ from your SSO name if needed.
Personal Information
Your core traveller identity, used for reservations and ticketing.
| Field | Description |
|---|---|
| Title | Mr, Mrs, Ms, Dr — or no title. |
| First / Last Name | Should match your passport — these are used on tickets. |
| Gender | Male, Female, or Other. |
| Date of Birth | Used for fare eligibility; must be a past date. |
| Nationality | Your country of nationality. |
| Phone | Country dialing code plus contact number. |
Profile completeness — once Title, First/Last Name, Phone, and Nationality are all filled in, your profile is marked complete and is used to pre-fill new bookings. Sensitive fields (date of birth, phone number, and passport number) are encrypted at rest.
Passport Details
| Field | Description |
|---|---|
| Passport Number | Alphanumeric; stored encrypted. |
| Issuing Country | The country that issued the passport. |
| Issue Date | Date the passport was issued. |
| Expiry Date | Must be a future date. |
Loyalty & Cards
Store frequent-flier and hotel loyalty memberships so they can be applied to bookings:
- Primary frequent-flier programme — your main airline programme and membership number.
- Additional frequent-flier cards — up to 3 more airline cards.
- Hotel loyalty cards — up to 5 hotel-chain memberships (Marriott, Hilton, IHG, Accor, Hyatt, and others).
Approval Delegation
Visible to managers and admins. Delegate your approval authority to another approver for a date range — for example, while you are on leave. While a delegation is active, approval requests that would come to you are automatically routed to your delegate; when it ends, they route back to you.
| Field | Description |
|---|---|
| Delegate | The manager or admin who will approve on your behalf. |
| Start / End date | The (inclusive) dates the delegation is active. |
You cannot delegate to yourself, and delegation periods cannot overlap. When the section is collapsed it shows an active count badge. Removing a delegation routes any pending approvals back to you immediately.
Travel Arranger
Nominate one colleague who can raise and manage travel requests on your behalf — for example, an executive assistant. When an arranger is set, the collapsed section shows a 1 assigned badge. You can have one arranger at a time; use Change to swap or Remove Arranger to clear it.
This is the other side of the On behalf of picker on the New Request form: when you nominate someone as your arranger, they can select you in their On behalf of list and book for you.
Approvals & Team Requests Manager
Review, approve, or reject travel for the people you manage.
Managers and admins get a Team Requests entry in the sidebar, showing requests raised by their direct reports.
Team Requests vs. Requests
- Requests lists your own travel requests.
- Team Requests lists requests raised by your direct reports. It adds an Employee column identifying the traveller, and supports the same status filter and column sorting.
Approving or rejecting
Open a request that is Pending Approval to review its details and policy compliance, then use the Approve or Reject buttons in the request header.
- Approve opens a dialog with an optional comment. Approving moves the request toward ticketing.
- Reject requires a reason. A rejected request enters a short grace period (Rejection Pending) during which you can still Reverse the rejection. After the grace period it becomes finally Rejected and the traveller is notified.
You cannot approve your own request unless you are configured as your own approver.
Delegated approvals
If a colleague has delegated their approval authority to you (see My Profile → Approval Delegation) and the delegation is active today, their approval requests are routed to you and the request shows a Delegated badge. You approve or reject exactly as you would your own.
Re-approval on a price change
A fare can change between booking and ticketing. If the price increases by more than the Price Threshold set in Settings, the booking is sent back for re-approval instead of being ticketed automatically, and the approver receives a price-change email showing the old and new amounts.
Leisure Travel
Book personal trips for yourself — separate from corporate travel.
When your organisation enables the leisure module, a Leisure Travel entry appears in the sidebar. It lets you search and book personal trips through the same booking engine, with important differences from corporate travel:
- Leisure bookings are not linked to the travel-request or approval workflow.
- They are not subject to corporate travel policy and need no manager approval.
- Payment is by your personal card at checkout on the booking site; no card details are stored in TravelDesk.
Choose Flights, Hotels, or Packages, enter your trip details, and click Search to open the booking site in a new tab. The products available depend on your tenant’s leisure configuration.
Travel Policies Admin
Control cabin class, hotel rate caps, and carrier restrictions applied to bookings.
Administrators configure travel policies under the Policies section. Policies control which cabin classes, hotel rates, airfares, and airlines are permitted for bookings. The page is divided into tabs for Flight Class, Hotel Rate Cap, Flight Rate, Advance Booking, and Carrier Rules.
4.1 — Flight Class Policy
The Flight Class tab defines the maximum permitted cabin class for each employee grade, split by flight duration.
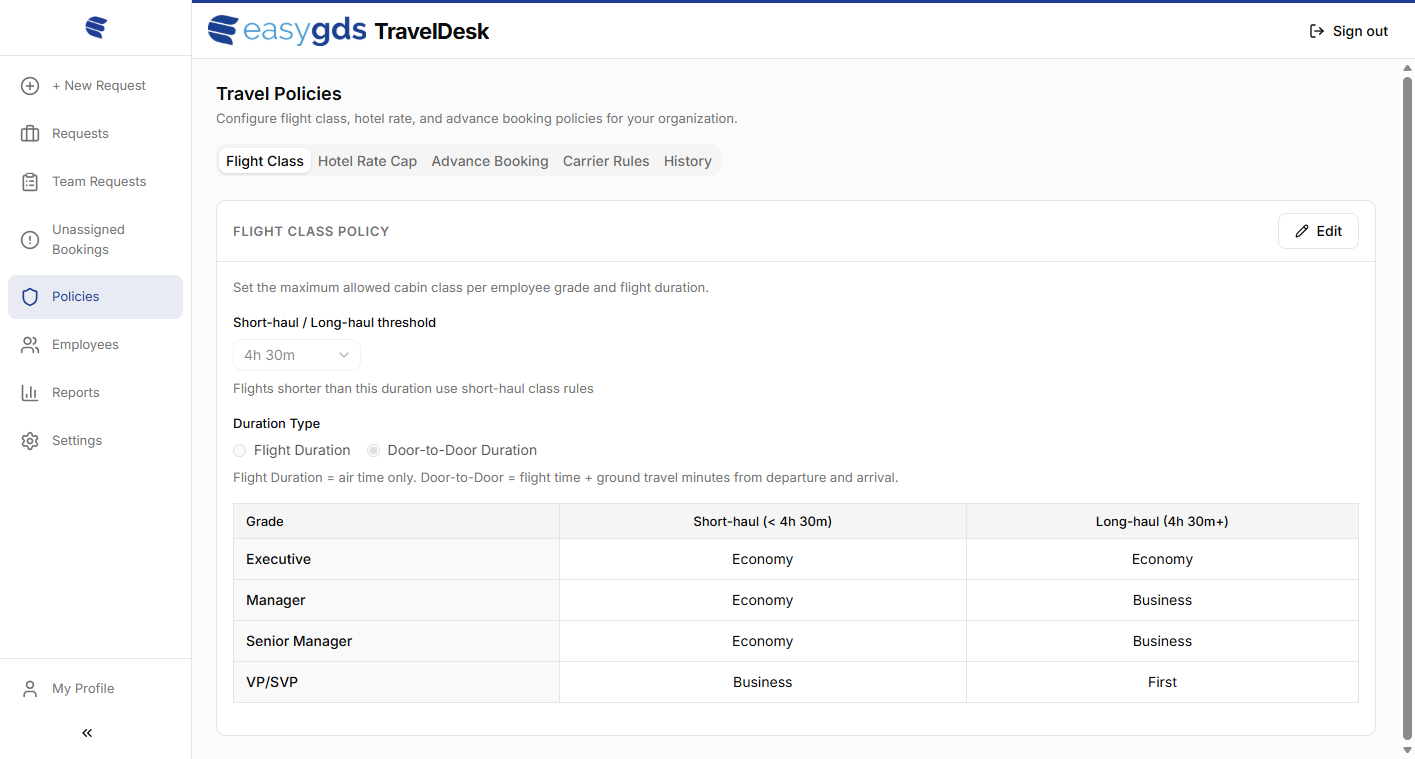
Short-haul / long-haul threshold
Set the duration at which a flight switches from short-haul to
long-haul rules. The default is 4h 30m.
Duration type
- Flight Duration — scheduled total flight duration
- Door-to-Door Duration — flight time plus ground travel minutes at both ends (not yet available)
Grade matrix (Example)
Each employee grade has separate cabin class limits for short-haul and long-haul flights:
| Grade | Short-haul | Long-haul |
|---|---|---|
| Executive | Economy | Economy |
| Manager | Economy | Business |
| Senior Manager | Economy | Business |
| VP/SVP | Business | First |
Click Edit to modify the matrix and save changes.
Redeye flight exception
Each grade has an optional Redeye flight exception toggle. When enabled, two extra cabin-class fields appear for the grade: Redeye short-haul and Redeye long-haul. Overnight flights then use these allowances instead of the standard short-haul / long-haul values; non-redeye flights continue to follow the standard rule.
Typical use: keep travellers in a lower cabin on day flights but allow a higher cabin (e.g. Business) on overnight long-haul sectors where rest matters.
How a flight is classified as redeye — the booking engine flags each flight leg as redeye at the time of search and TravelDesk consumes that flag as-is; there is no threshold to configure here. A leg qualifies as redeye when all three conditions hold (times are in the leg’s local timezone):
- Scheduled departure is between 21:00 and 01:00.
- Scheduled arrival is between 04:00 and 09:00.
- The flight crosses midnight — arrival date is departure date + 1.
A late-evening flight that lands the same night, or an early-morning flight that departs after 01:00, is not redeye and uses the standard short-haul / long-haul cabin allowances.
4.2 — Hotel Rate Cap Policy
The Hotel Rate Cap tab sets maximum permitted nightly hotel rates. Bookings exceeding the applicable cap are flagged as non-compliant.
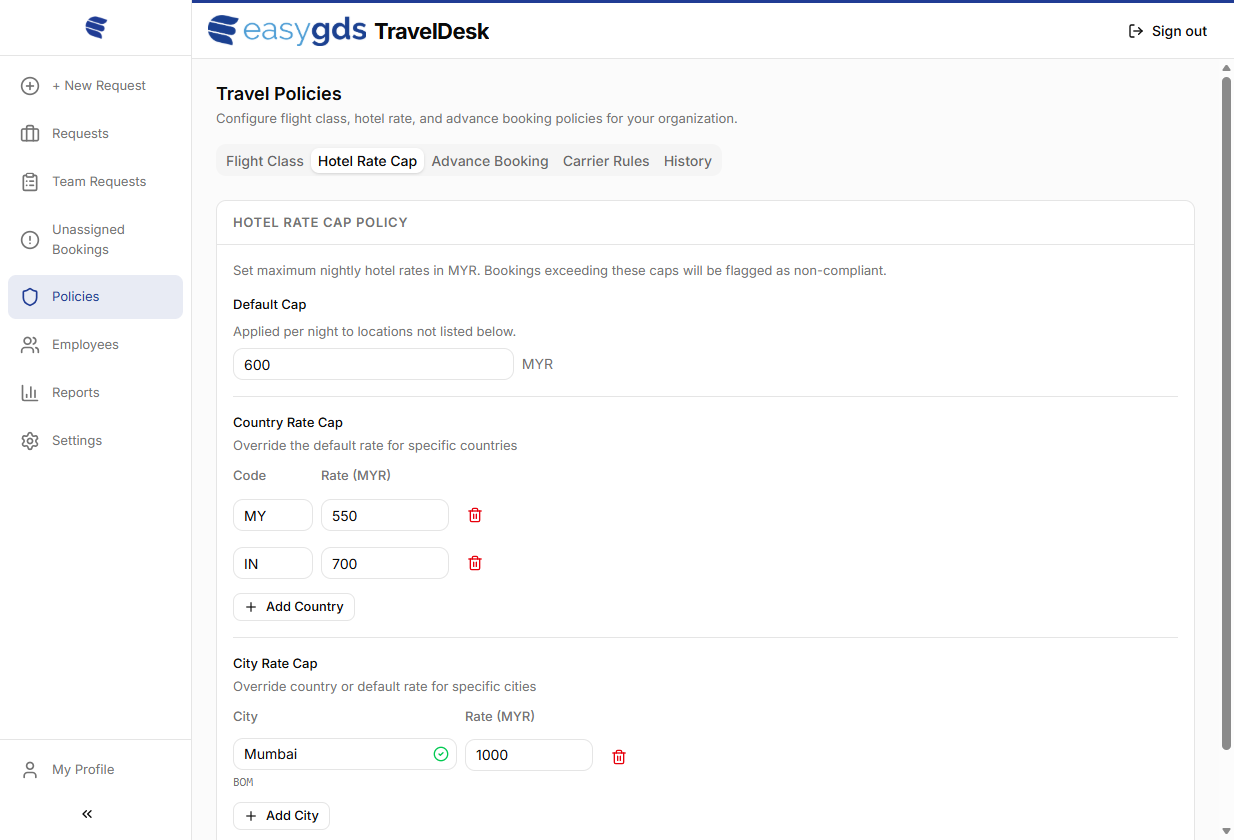
Default cap
The fallback nightly rate (in MYR) applied to all destinations not covered by a country or city rule.
Country rate cap
Override the default rate for specific countries using the two-letter
ISO country code (e.g. MY for Malaysia, IN for
India).
City rate cap
Override the country or default rate for specific cities. Search by
city name; the system resolves the IATA airport code automatically
(e.g. Mumbai → BOM).
Rule precedence — City cap overrides Country cap, which overrides the Default cap.
Use + Add Country and + Add City to add new entries. Click the trash icon to remove an entry. Save all changes with the Save button.
4.3 — Flight Rate Cap Policy
The Flight Rate tab sets per-route maximum airfares by cabin class. Bookings exceeding the applicable cap are flagged as non-compliant.

Enable flight rate cap
Turn the policy on or off for the tenant with the Enable flight rate cap toggle at the top of the tab. When disabled, no fare check runs regardless of saved rules.
How amounts are interpreted
A single saved amount expands to cover every itinerary shape:
- Amounts are entered as round-trip fares — the figure you type is the round-trip baseline.
- One-way — 70% of the round-trip amount is used.
- Multi-city — the amount is divided by the number of sectors.
- Routes apply bi-directional — a rule for
BKK → KULalso coversKUL → BKK. - Cabin-specific rules override
Any cabin— if both could match the booking, the cabin-specific rule wins.
Rule fields
| Field | Description |
|---|---|
| Cabin | Cabin class the rule applies to (e.g. Economy, Business), or Any cabin to cover all classes. |
| Origin | IATA city code of one endpoint (e.g. BKK).
Bi-directional — order does not matter. |
| Destination | IATA city code of the other endpoint (e.g. KUL). |
| Max Fare (round-trip) | Maximum permitted round-trip fare in the tenant’s default currency (e.g. MYR). One-way and multi-city are derived per the rules above. |
Use + Add Rule to add a new fare cap. Click the trash icon to remove a rule. Click Save to apply all changes.
4.4 — Advance Booking Policy
The Advance Booking tab requires bookings to be made a minimum number of days before departure. Bookings made with less notice are flagged as non-compliant and therefore routed for approval.
Minimum days before travel
Enter a whole number (0–100) in Minimum Days Before
Travel. A booking is non-compliant when it is made fewer than
this many days before the departure date — for example, with a value of
7, a booking made 6 days out is flagged, while one made 7
or more days out is compliant. Set the value to 0 to
disable the check. The rule applies to all grades.
Click Save Advance Booking Policy to apply; changes go live within about 30 seconds.
4.5 — Carrier Rules
The Carrier Rules tab restricts which airlines are permitted on specific routes. More specific rules (city pair) override broader rules (country pair).
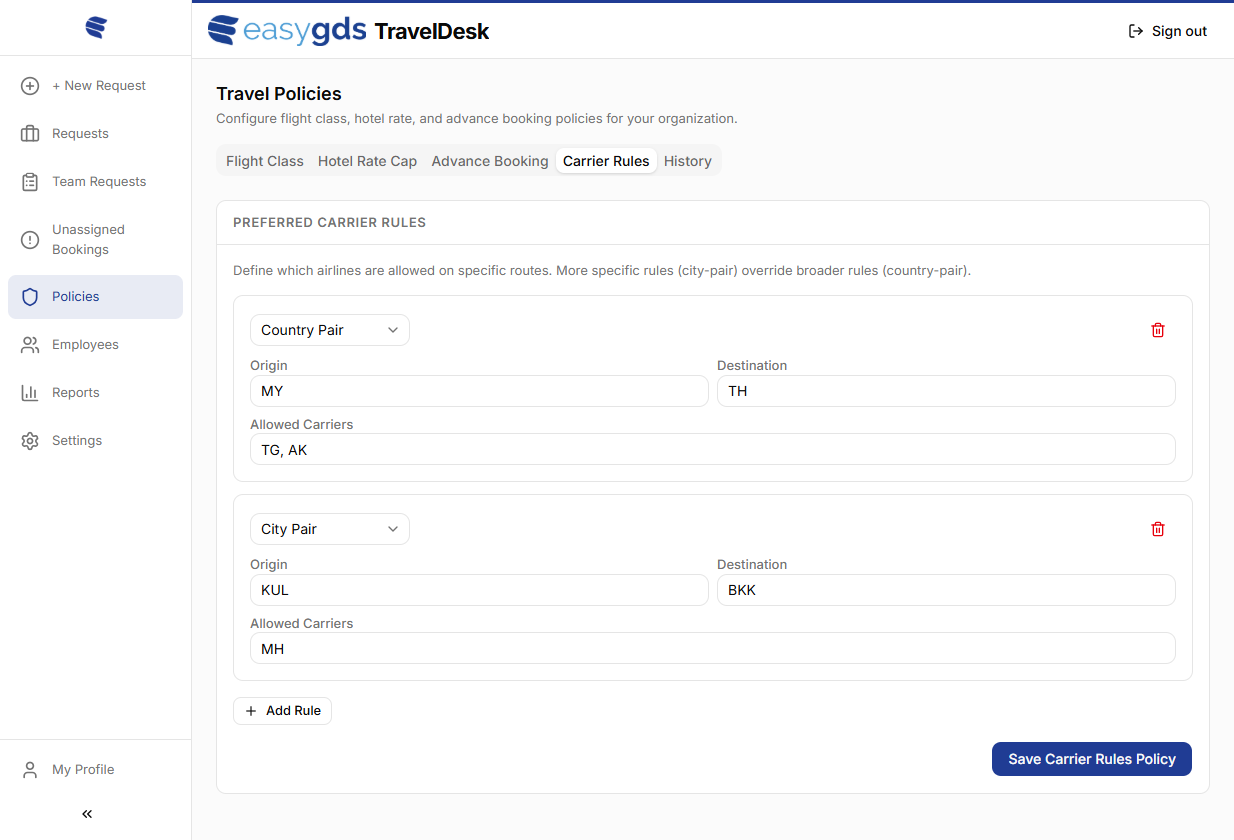
| Field | Description |
|---|---|
| Rule type | Select Country Pair or City Pair from the dropdown. |
| Origin / Destination | Country codes (e.g. MY, TH) for country
pair; IATA city codes (e.g. KUL, BKK) for city
pair. Leave both empty to make the rule global —
applied to every route. |
| Allowed Carriers / Denied Carriers | Comma-separated IATA airline codes (e.g. TG, AK or
MH). The field label switches depending on the
Negative rule toggle below. |
| Negative rule | When Off (default), the rule is an allowlist — only the listed carriers are permitted on the route. When On, the rule is a denylist — the listed carriers are blocked and any other carrier is permitted. |
Click + Add Rule to add a new carrier rule. Click the trash icon to remove a rule. Click Save Carrier Rules Policy to apply all changes.
Rule precedence — every saved rule is evaluated against the booking, then matches are ranked by this ladder:
- Specificity first.
City Pair(most specific) beatsCountry PairbeatsGlobal(origin and destination both empty). - Deny beats allow at the same scope. When two rules at the same specificity target the same route, a negative (denylist) rule wins over a positive (allowlist) rule — the listed carrier is blocked.
- No matching rule = compliant. If no carrier rule binds to the route at all, the carrier is permitted by default.
Worked example — with these two rules saved:
- Global, allow
MH - Global, deny
MH
…a booking on MH for any route is
NON-COMPLIANT: both rules sit at the same
Global scope, and deny wins the tie. Add a more-specific
positive rule (e.g. City Pair KUL → BKK, allow
MH) to override the deny on that route.
Unassigned Bookings Admin
Match bookings that arrived without a linked travel request.
Most bookings made through the booking site are matched to their travel request automatically. When a booking can’t be matched — for example it carries no request reference, the booker isn’t recognised, or its data couldn’t be fully read — it lands in Unassigned Bookings for an admin to resolve.
Each row shows the Booking Ref, Booker Email, Date received, Destination, and Status. For each booking you can:
- Assign — search for the employee the booking belongs to, then either link it to one of that employee’s existing requests or create a new request for them (they are emailed to complete the trip details). Once assigned, the booking is evaluated against policy and continues through the normal lifecycle.
- Reject — discard the booking and cancel its PNR. This cannot be undone.
Employees Admin
Manage who can use TravelDesk and the grade, department, and role that drive their policies and approvals.
The Employees page lists everyone in your organisation, with columns for Name, Email, Department, Grade, Role, and Status.
- Add / Edit — create or edit an employee. Each record has an SSO identity (login name and email), a traveller name (Title plus first/last used on tickets), and an organisation block: Department, Grade, Status (active / inactive), and Role (employee / manager / admin). You can also set a manager override for the approval chain instead of using the department’s default manager.
- Upload CSV — bulk-import or update employees from a spreadsheet. Required columns are email, first name, and last name; optional columns include role, department, grade, manager email, and traveller-profile fields (passport, nationality, loyalty numbers, and so on). Email is the unique key, so re-importing updates the matching employee. A template can be downloaded from the dialog.
- Filter / search by department, grade, status, or name / email.
A grade governs the cabin-class and rate caps that apply (see Travel Policies); the department determines the default approving manager.
Removing an employee
Delete removes a person’s access, not their record. The employee is kept (marked removed, with who deleted them and when), and their past travel requests and bookings stay attached to their name for reporting and audit — nothing is permanently deleted. What ends immediately is access: their account membership and any active sessions are revoked, so their next request is blocked, and a pending invitation’s link stops working. Re-adding the same email reactivates the same record — no duplicate — so the person’s profile and history carry over.
Email sign-in (invitations)
If your organisation signs in with an email one-time code — configured for your tenant by your easyGDS TravelDesk representative, on its own or alongside SSO — the employee roster doubles as the access list. Adding someone here emails them a sign-up invitation; they confirm their email and join. This is the only way an account is created; there is no open self-registration.
While an invitation is outstanding, the Status column shows an extra badge, and a pending row gains an envelope action:
| Indicator | Meaning |
|---|---|
| active + sign-up pending | On the roster; invitation not sent yet. |
| active + invite sent | Invitation emailed; waiting for the person to accept and sign in. |
| active (no extra badge) | They accepted the invitation and signed in — now a full member. |
Use the envelope icon on a pending row to send or resend the invitation; resending invalidates the previous link and emails a fresh one. Removing a pending employee revokes their invitation (the link stops working); removing a joined employee ends their access on their next request — the same as for SSO employees.
SSO and email together — a person invited by email who later signs in with Google or Microsoft using the same email address maps to the same employee profile; they don’t get a duplicate account.
Allowed email domains
When invitation-based email sign-in is on, TravelDesk checks each new employee’s email domain against the tenant’s Allowed Email Domains list at the moment you add them, so an off-list address is rejected before any invitation goes out. A single add shows an error naming the domain; a CSV upload with any off-list row is rejected as a whole and nothing is imported.
How the list is read:
- One exact domain per entry, comma-separated —
e.g.
acme.com, acme.org.someone@acme.comis allowed;someone@other.comis not. - Leave it empty to allow any domain — an empty list applies no restriction.
*or*.*also allows any domain — either token is an explicit “any domain is fine.” This behaves the same as an empty list, but states the intent plainly, so it’s the clearer choice when open access is deliberate.- No partial wildcards — only the exact tokens
*and*.*are wildcards. A pattern like*.acme.comis treated as a literal domain and matches nothing; list each full domain you want to permit.
The roster grants access — the list only limits who can be added. The domain check runs when you add or invite someone, not at each sign-in: a person already on the roster can sign in even if their domain isn’t listed, and tightening the list later doesn’t remove existing members (remove them to revoke access). On email-code / SSO workspaces the list isn’t applied to roster adds at all — adding an employee is itself the trust signal — so there it only limits self-enrolment.
Reports Admin
Analyse travel spend and policy compliance across the organisation.
The Reports page (titled Expense Analytics) gives a spend and compliance overview.
It includes:
- a spend trend chart and a total spend figure (with trip count);
- a policy compliance breakdown (compliant vs. non-compliant bookings);
- spend broken down by cost center, product, department, airline, destination, and employee.
Use the filter bar to set a date range (presets such as This Month, This Quarter, YTD, or Last 12 Months, or a custom range), change the granularity (daily / weekly / monthly / annual), and filter by department, employee, or status. Export with Export Dashboard CSV (summary), Export Raw Data (transaction-level), or Print / PDF.
Settings Admin
Configure system-wide booking behaviour, approvals, and org structure.
The Settings page controls system-wide booking behaviour, approval automation, and organisational structure.
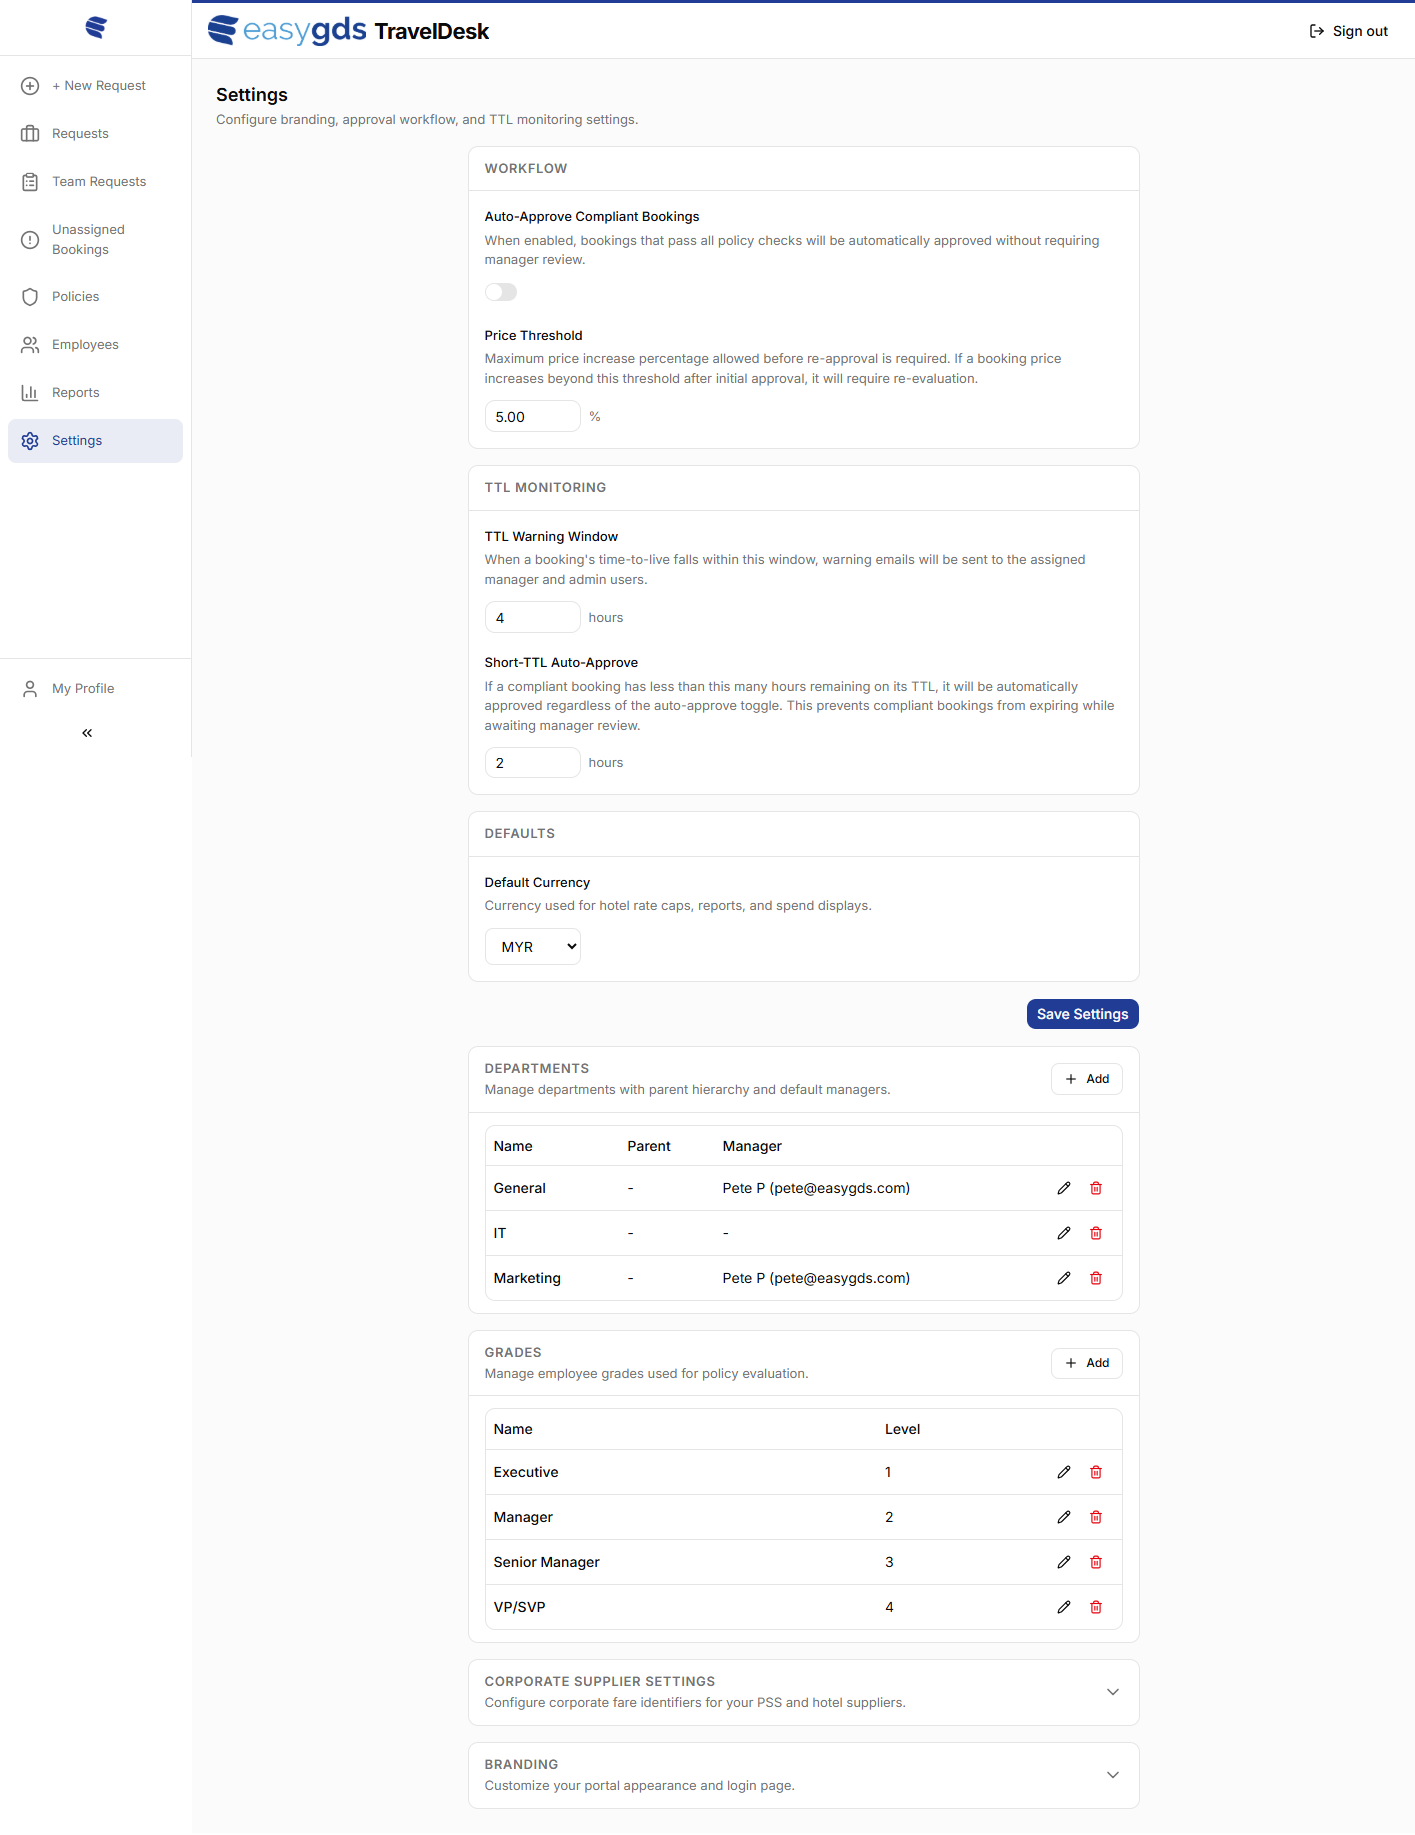
Booking flow
| Setting | Description |
|---|---|
| Auto-Approve Compliant Bookings | When enabled, bookings that pass all policy checks are automatically approved without requiring manager review. |
| Price Threshold | Maximum cost increase percentage allowed before a re-approval is triggered. |
TTL monitoring
| Setting | Description |
|---|---|
| TTL Warning Window | If a booking time limit is reaching this window, a warning email is sent to the designated manager and admin. |
| Short TTL Auto-Approve | If a booking has fewer than this many hours remaining before it expires, it is automatically approved to prevent the booking from being cancelled. |
Defaults
| Setting | Description |
|---|---|
| Default Currency | Base currency used across all rate displays, reports, and exports
(e.g. MYR). |
Departments
Manage your company’s departmental hierarchy. Each department can have a Parent department and a designated Manager. Use + Add to create a new department and the edit / delete icons to modify existing ones.
Grades
Define the employee grade levels used for policy evaluation (e.g. Executive, Manager, Senior Manager, VP/SVP). Each grade has a numeric Level used to determine seniority ordering. Use + Add to create grades and the edit / delete icons to manage them.
Corporate supplier settings
Configure preferred supplier identifiers for your GDS and hotel suppliers (expandable section).
Branding
Customise your organisation’s name and login page logo (expandable section).
Billing and Invoicing
The Billing and Invoicing section allows tenant admins to configure a billing profile that pre-fills invoice details when employees book travel through the Core Engine booking site. This section appears as an expandable disclosure below Branding.
Enable Billing toggle – The toggle at the top of the section controls whether billing data is sent to the booking site. When disabled, no billing information is transmitted and the booking site will not prompt the traveller for invoice details.
| Field | Description |
|---|---|
| Payer Type | Select Individual or Company to identify the billing entity type. |
| Nationality | Select Malaysian or Non-Malaysian. Controls whether conditional fields (NRIC Number, Malaysia State) are shown. |
| Billing Name / Legal Entity Name | Legal name of the individual or company for invoicing. |
| Invoice Email | Email address for invoice correspondence. |
| Phone | Country code and phone number for the billing contact. |
| Billing Address | Full billing address as a single text field. |
| Country Code | ISO-2 country code (e.g. MY for Malaysia). |
| Malaysia State | State within Malaysia. Only visible when Nationality is set to Malaysian. |
| NRIC Number | Malaysian National Registration IC number. Only visible when Nationality is set to Malaysian. |
| City | City for the billing address. |
| Postcode | Postal code for the billing address. |
| Tax Identification Number (TIN) | Tax ID for the billing entity. |
Conditional fields – When Nationality is set to Malaysian, additional fields appear for Malaysia State and NRIC Number. These fields are hidden for non-Malaysian entities.
Security – Sensitive fields (TIN, NRIC Number, phone number, invoice email, and billing name) are encrypted at rest.
Click Save Billing to apply changes within the Billing and Invoicing section.
Click Save Settings to apply all changes on this page.